
I’ve written articles here in the past about using an action camera when kayaking. However, things have moved on a bit since then, and the cameras now are much more capable, so here’s a renewed look at things.
Kayaking is difficult to film because of the environment we are usually in combined with the limited options for mounting a camera. The usual default is to mount the camera on a helmet, and this gives a great POV with the right settings and camera, but it can also be extremely boring. So, I’m going to cover a few things here, from camera options through to thoughts on actual filming and editing.
In recent years I’ve been a convert to 360 cameras. The creative freedom you have, as well as the crazy wide POV you can get from such a camera is amazing, and I’m looking forward to seeing if GoPro release a successor to the MAX later in the year. Below is a video I made with the Insta360 ONE RS during a day on the Tryweryn.
A 360 camera does require additional pre-editing, ahead of your main edit, so they can be time consuming and occasionally frustrating to deal with, but I think the results are worth it. However, most people are using traditional action cameras, most usually a GoPro.
If you want to make a video about your day out boating then there’s a few things we can take from general film and programme making. An important thing when it comes to making an interesting video is having a variety of angles, or at least some sort of choice, which I’ll come to later. Let’s begin with the boat based cameras.
Camera setup
Setting up your camera’s base settings is important. If you aren’t going through a colour grading process the the auto white balance does a good job. If you are doing some grading, set this to manual, generally around 5500K if you are filming in daylight. I’ve listed a cheat sheet of base settings below.
Settings for technophobes
- White balance: Auto
- Sharpness: Low
- Bitrate: Standard (for people with limited storage space) High (if storage isn’t a problem)
- Colour: GoPro
- Max ISO: 800 (for HERO8 and previous) 1600 (HERO9 and above)
- Resolution: 1080p (for people with low powered laptops and limited hard drive space) 4K+ (for those who love quality)
- Wind filter: Off (it causes a muffled sound when it gets dunked in water)
- Raw audio: Off
Settings for experts or wannabe experts
- White balance: 5500K for daylight outdoors
- Sharpness: Low
- Bitrate: High
- Colour: Flat (HERO9 and previous) Flat (for HERO10 in really contrasty light) Natural (for a good balance between gradability and great results straight out of the camera)
- Max ISO: 800 (for HERO8 and previous) 1600 (HERO9 and above)
- Resolution: 4K or above whenever possible. 4K or 5.3K 4:3 if you want to really fine tune things in the edit.
- Wind filter: Off (it causes a muffled sound when it gets dunked in water)
- Raw audio: Off (it isn’t really needed in watersports)
Lens/view settings
I’m now very firmly of the opinion that you need at least two action cameras. One on your helmet, and one on the bow or stern of your boat (or on the bow or stern of a friend’s boat). I’ve covered modes to use on your camera for the helmet based device, and on a GoPro this will either be Superview or, if you want some flexibility for reframing or stabilising in editing, 4:3 Wide.
Generally with kayaking and helmet cam, Superview will be your best option if you want minimum hassle in editing. 4:3 gives some ability to deal with the lens distortion afterwards and is suited to people who want to fine tune, and can give superior results in the end.
The great thing about the HERO10 is that with the standard HyperSmooth engaged, it gives a usefully wider field of view than the HERO9 and previous cameras. With POV shots you really want the widest possible view you can get for the most immersive result. A lot of alternative cameras such as the DJI OSMO Action have too narrow a view. However DJI rectified that with its flawed Action 2 camera, which has an utterly amazing ultra-wide mode. It’s just a shame it’s no good for a day on the river mounted on a helmet, since it’s far too big and bulky inside the waterproof housing with the required power module.
For the stern or bow mounted camera facing the paddler, the Linear Plus Horizon Levelling on the HERO9 and HERO10 can create some pretty cool looking shots that show the motion of the boat. This works best if you have a longer hull. For a playboat you’ll probably want the wide setting and turn the HyperSmooth off. Likewise if you have a camera previous to the HERO9 or 10 and you attach the camera to the hull, turn the HyperSmooth option off.
The hull mounted cameras will generally capture reactions, so it’s good to shoot at a high frame rate for slow motion effects. You could go all the way up to 120fps on a HERO10 in 4K, but 60fps should suffice in most instances and save battery life.
There have been some recent developments that give a few more options with settings. GoPro has just released a new version of its Player software, which now incorporates ReelSteady. ReelSteady was designed for stabilising FPV footage from drones, but it works incredibly well with all types of shots, including POV. The latest update will even further stabilise shots taken with HyperSmooth switched on, as well as 16:9 ratio clips (previously it could only work on 4:3 clips).
What does this mean for us? Well, it means that if you don’t mind taking the extra step of stabilising footage before you edit it, we can get the widest possible angles using the 4:3 mode on the GoPro with HyperSmooth switched off, and maintain most of that wide angle after using ReelSteady for stabilisation. Additionally ReelSteady will eliminate the curved fisheye effect of the GoPro as well. For users of older GoPros before the HERO7, this means you can get better than HyperSmooth quality results even without the latest and greatest camera. ReelSteady can even perform horizon levelling, too.
Where/how to mount the camera
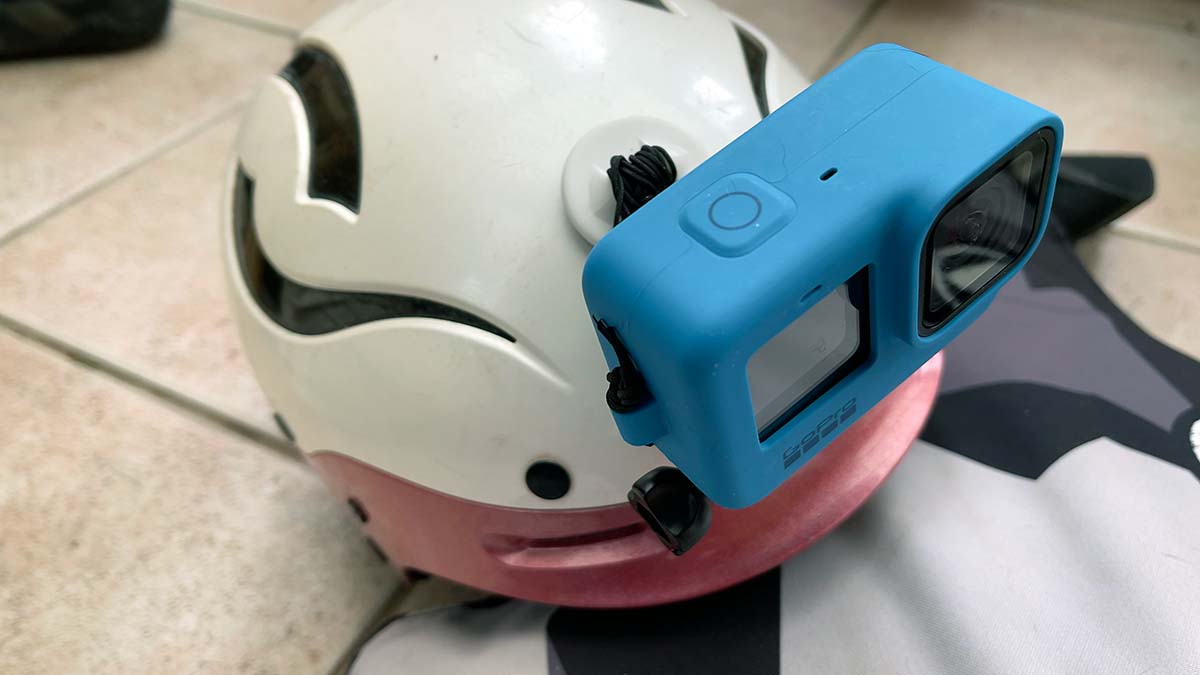
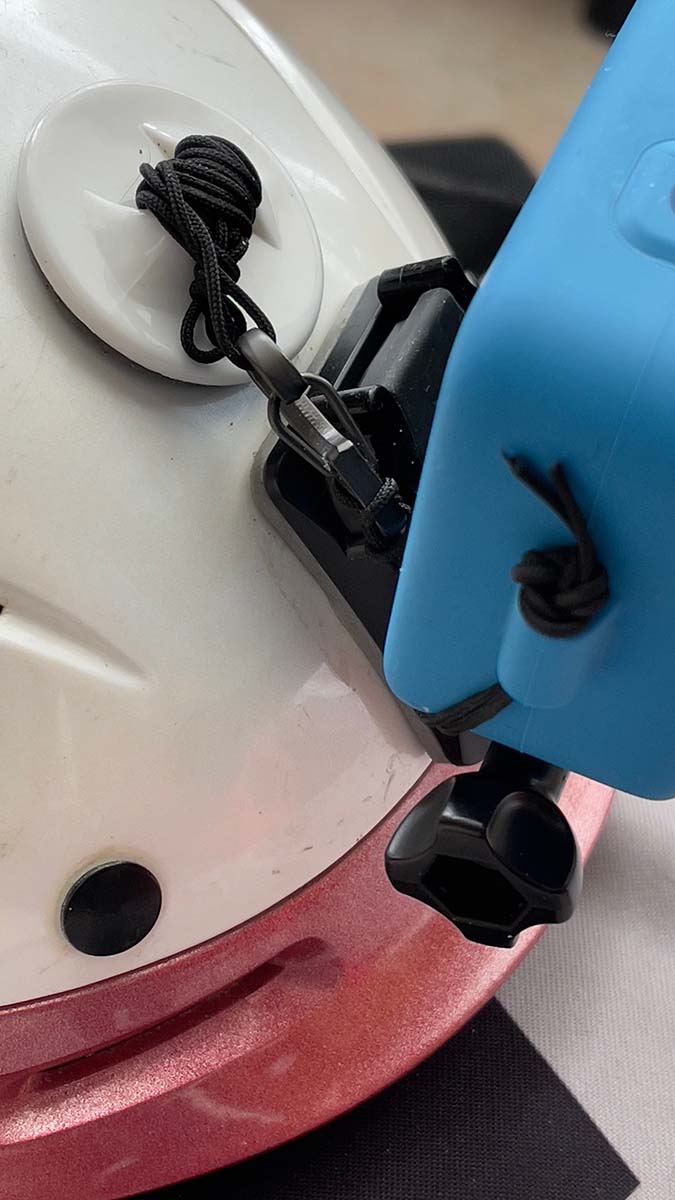
A lot of people put their helmet mounts right on top of their helmets. I find this to be quite restrictive, preferring instead to mount the camera near the front of the helmet. I attach a surf mount tether right behind it, and house the GoPro inside a silicon case. I then tether this using a micro carabiner. Attaching the camera in this way gives you some degree of safety if your camera becomes detached during a capsize, but also totally minimises any wires and string from being a snag hazard. Of course it mustn’t be forgotten that the GoPro itself is a snag hazard, but that’s for your own risk calculation. My feeling is that mounting the camera nearer the front of the helmet rather than on top also reduces its risk a little bit from snagging.
Using a micro carabiner also means that if I only bring one camera to the river, I can swap the camera over to a different position more quickly than other types of tethering. I have occasionally used a Floaty, but with the HERO9 and HERO10 I find that it makes the camera absolutely ginormous, so I don’t tend to use it these days, despite the additional protection from loss it gives.
When you are sticking your GoPro mount to either your helmet or the boat hull, make sure you clean the surface thoroughly with isopropyl alcohol and let it dry. Then, for an ultra-secure mounting, peel away the backing from the sticky mount and heat it up thoroughly with a hair dryer. While it’s still warm/hot, stick it down firmly in position and hold it down firmly for a while, working over all the edges. Often with the curvature of the helmet you might not get it all completely flush. Just do as best you can. Heating up the sticky pad first will make a huge difference to the strength of the attachment. Now leave it for 24hrs.
With boat hull mounting, I have used traditional GoPro sticky mounts in the past, and they work to a degree. The problem with them is that they are not as good for more creative mounting where the camera might be subject to more force leveraging. In fact the sticky mount on my Helixr is bent and will no longer hold a camera properly, so instead I prefer to attach a mount to one of the grab handles.
It’s taken me many years to find a clamp that will attach to a kayak grab handle properly. The vast majority of clamp mounts, such as those designed for poles or handlebars, simply don’t do the job. 99% of them can’t close up far enough to clamp onto a bar the diameter of a kayak grab handle, while a similar portion more have their tightening screws in an impractical place for the bars as well (usually underneath where you can’t properly fit them into the available space).
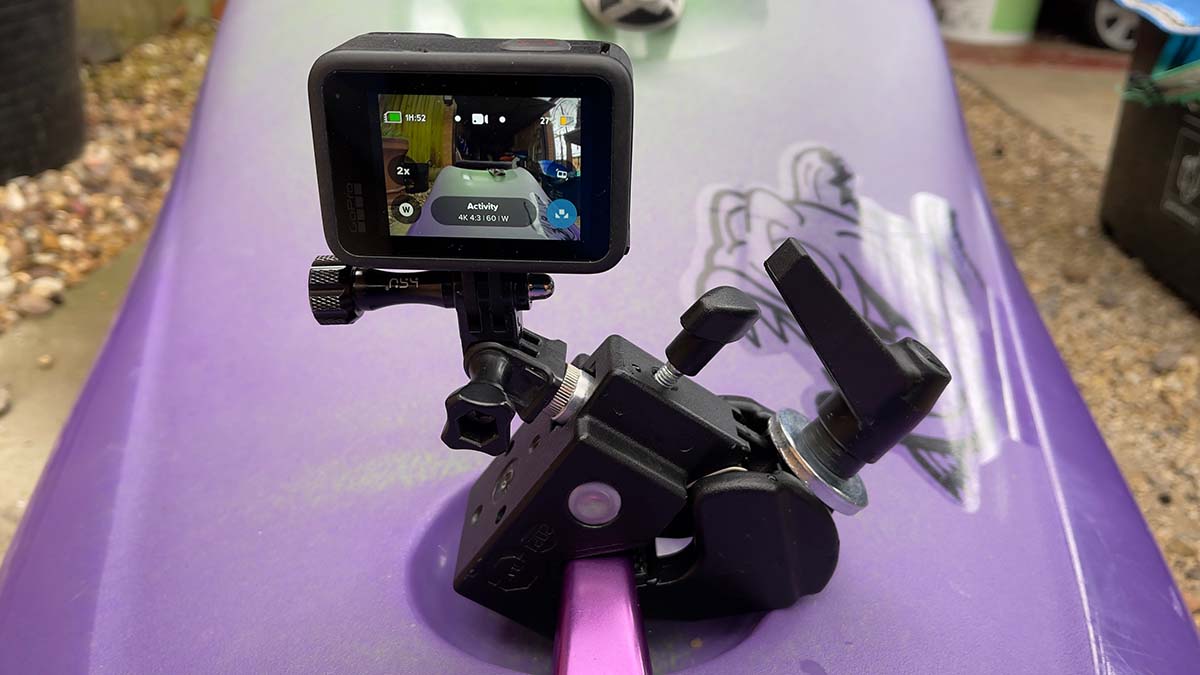
One of the best clamps I have found is called a Super Clamp. Specifically the one made by Manfrotto. This is a clamp that is designed to hold film lights, and it is rated for up to 15kg of weight. It’s an absolute beast, but despite its size it clamps around a grab handle perfectly. It’s not great for the aesthetic of the hull lines though! On the other hand it is totally solid. Nothing will move it once you’ve tightened it.
Now, I should point out the safety aspect again here. While this type of clamp still allows a bit of an area of the grab handle to be used, it is a safety consideration. It might not be the best place to mount a camera if you are running a tight, pinny river or tree filled ditch. For big volume or more cruisy runs however, mount away!
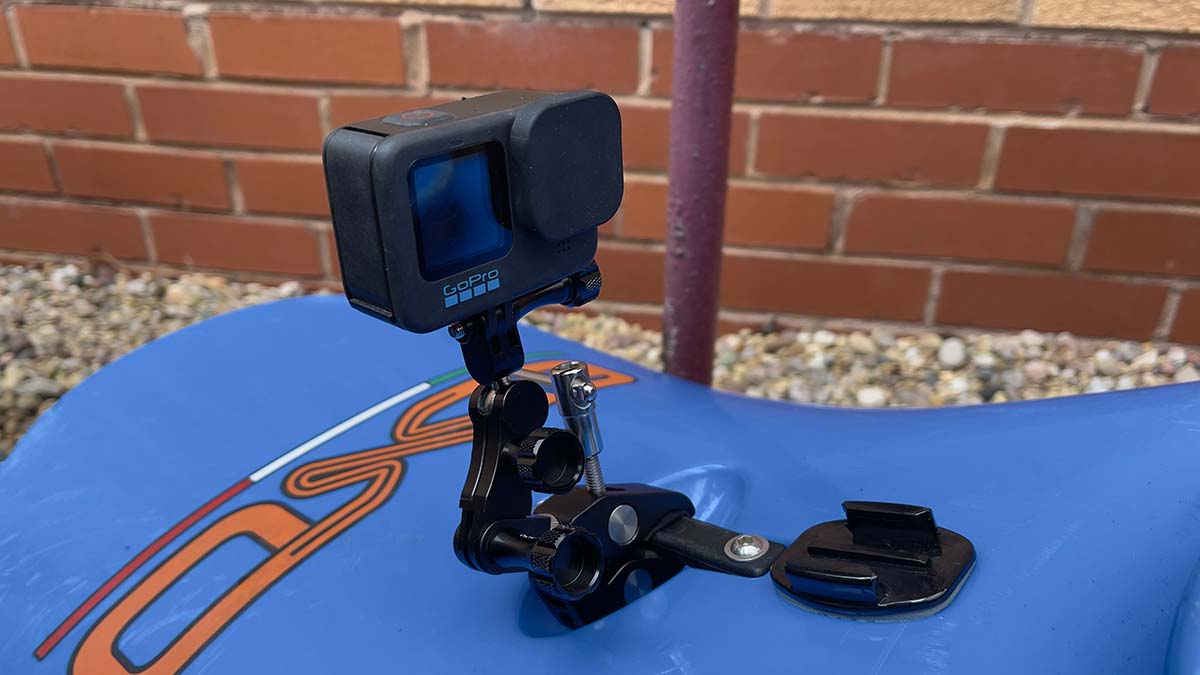
Due to the size of the Manfrotto clamp I am also investigating two more alternatives. One is from SmallRig, and the other is a dedicated Tough Claw GoPro mount from RAM Mounts. Both of these look strong, although I’ve yet to see if they will stay put once the huge forces of a large stopper or sea wave pound against them. But I will give them a try and let you know how it goes! Certainly if they work they will be more discrete than the Manfrotto Super Clamp. In the off-water tests I have done they do seem pretty solid when attached carefully.

So that’s the grab handle clamp sorted; now you now need to set up a decent angle. Generally, mounting the camera at the same height as the grab handle is far too low. It can be done if you want the lowest possible profile, but it doesn’t give the best shot. An unfortunate reality is that the camera position that looks aesthetically good on the boat is also the one that gives the worst angle, and vice versa. Even lifting the camera up a little bit makes a big difference. With a long boat this is easier, although often you need to get a good compromise between lifting the camera up and getting in the way of the paddle. Usually the camera gets hit by the paddle if you’re one of those people who holds their top arm low during surf carving.
One thing to take into account when you attach one of these clamps is to consider the direction of force of the water. Try to position it such that any hard hit will get supported by the hull of the boat rather than allowing the mount to rotate around the handle.
Chesty mount
I covered using the Chesty mount in a previous post, and with the new ReelSteady abilities it opens up new possibilities with the GoPro. The Chesty mount is underestimated because a lot of people haven’t looked at how best to get a decent angle from it. Kayakers often use it wrapped around their PFD, but this is not only a potential safety issue, but it gives a rubbish view of things.
The trick is to use the Chesty mount around your torso as per normal, and then wear the PFD over the top of it. Then when you mount the camera you’ll need some extension bars to lift the camera up to just below the chin level. This gives a more realistic POV view, very close to what you’d get if you used the Bitey mount (NOT recommended for WW kayak use!)
I use a curved extension mount to let me move the camera away from or closer to my body. In my previous article I used this curved mount to make the camera effectively sit on top of the to of the PFD. This was to get rid of any possibility of the PFD or its straps appearing in shot. With ReelSteady software stabilisation however, it is better to reverse the curved mount to bring the camera closer to the body. You’ll see a bit of PFD visible in the bottom of the shot, but this will disappear once ReelSteady has done its thing.
The great thing about the Chesty is that it is less intrusive than the helmet mount, doesn’t make you look like a Tellytubby, is less likely to be ripped off if you go over, you can see whether the camera is recording without having to check with your mates all the time, and the white water looks more like the size it is in reality rather than being flattened out as much. A side use of the extension rod means that you can also de-clip the camera from the mount and use the rod as an instant short selfie stick.
The down side is that you maybe don’t get as elevated a view of the river ahead and it isn’t as easy to film friends as they pass by. Hmm, maybe I should revise things to a three-camera minimum!
The truth is that it is probably worth swapping over and varying things throughout a trip, although as anyone who has done this knows, that’s a pain. The idea behind having two cameras in the first place is to minimise the amount of swapping and changing.
Using dual GoPros for an edit
Below is an edit I made filmed entirely on a HERO9 and a HERO10 in 4K 4:3 mode and then stabilised with the GoPro Player software. The establishing shots are entirely handheld.
As you can see, I wasn’t exactly having a great day on the river! However, it serves as an example that although events during the making of the video didn’t really work out as intended, you can still create an edit that works.
Using the ReelSteady stabilisation was interesting. Sometimes you do get a strange ‘zoom’ effect, but for the most part I like the stabilisation it gives more than the camera’s built in HyperSmooth system. One reason is because ReelSteady gets rid of the fish eye distortion, and it manages to stabilise whilst still retaining a very wide angle of view. You can even lock the horizon level, which for many POV shots works really well, and reduces the need in some cases for the Max Lens Mod.
As you can see from the video above, ReelSteady gives some excellent results for establishing shots. You can get almost dolly/slider quality shots completely handheld, and it’s smoother than HyperSmooth. You can fully control the level of stabilisation, too. For the POV helmet and boat mounted shots I reduced the stabilisation smoothness down to the minimum of 1. This allowed the shots to retain some movement and energy, although for the establishing shots I kept the smoothness set to the default of 50.
I hope this gives you some ideas on how to mount your action camera to your kayak, as well as how you might approach an edit, rather than simply producing yet another head cam edit. The only limit is your imagination, and your patience for making something a bit more involved.

Hello Simon, Many thanks for your very useful and insightful articles in this blog, as well as your YouTube videos. You must be one of the very few professional photographers / video producers, who also is a whitewater kayaker and who also generously takes time to share your knowledge on the internet. -How has your experience been with the above-mentioned RAM Mount Tough-Claw and the SmallRig Super Clamp, when mounted to your kayak’s grab handles? -Which one has functioned best? I will try mounting a RAM Tough-Track Top-Loading Composite 2.43″ Track on the backdeck of both my surfski and ww kayak, for attaching the RAM Tough-Pole 31″ Camera Mount with RAM Track Ball Base, for easy on-off mounting. PS. I recently ordered the Waka Skuxx Deluxe, partly because of your positive comments in your blog (I have not picked it up yet). I also intend to buy the DJI Osmo Action 5 Pro, again partly because of your positive comments in your review at the RedShark website. Kind regards from Sweden.
Thanks for the kind comments! Both the mounts are very solid. Though I only use them in situations where I’m unlikely to need to roll. It’s really tough getting unique angles for kayaking, so I’m always thinking about different ways to mount. Regarding the Osmo Action 5, I would hold off for the moment. The new version is just around the corner, and the new GoPro is also coming out with a brand new GP3 chip, which will massively improve battery life and imaging capabilities.