
I love my Exo Helixir, and as far as my limited play boating knowledge goes, it’s the best playboat I’ve owned. So I decided to make it better.
Yes, I do sometimes get pangs to try a Rockstar V or Eric Jackson’s new Rebound, but the reality is that I’d need to be a top level competitor to actually gain something meaningful from changing over. The Helixir is a fantastic freestyle boat, although there is one aspect to it that I don’t like; the weight.
Weight in a freestyle boat can affect things quite noticably, from the amount of energy it takes to throw it around, to how fast it will complete a loop. Those who read this blog regularly will know that back when I owned a Jitsu I took it on an extreme weight loss diet, ditching all the heavy Contour outfitting and replacing it all with foam blocks and a Guigui Prod seat. The result was a plastic freestyle boat that weighed only 11.5kg, and it made a big difference on the water.
Cartwheels were faster and easier, and the boat floated slightly higher in the water since taking the weight out effectively increases the maximum paddler load the boat can handle. So when I bought the Helixir, although I loved the boat, I always wanted to lighten it.
Thankfully Guigui Prod already thought of this and created a lightweight carbon outfitting kit to replace the all-plastic one that the boat comes with by default. You can actually buy the Helixir with the carbon kit pre-installed, but for existing owners you can purchase it separately. You can even use a variation of the kit in your creekboat/half slice. The saving is around 1.5-2kg, which is nothing to sniff at. That’s more than the weight of a hefty Canon 70-200mm f/2.8 zoom lens. Quite a bit in other words.
I ordered the kit from Flow Kayaks, although due to a slight mishap during packing, I had to wait for the seat to arrive separately. It was just an innocent error caused by the courier service, requiring a repacking, and the seat accidentally got left out. No biggie.
What’s in the box?
The carbon outfitting kit comes with bow and stern foam bulkheads, a carbon hull rail, hull side support blocks, a foam seat, and some high quality contact adhesive. All very simple, and if you watch the video by Guillaume Respaud it also looks very simple to install… Err, well, yes… Let’s look at that.
But first a caveat. Bear in mind that this kit will change the way your boat feels on the water. The carbon rail will stiffen the hull up, but the foam seat will position you noticeably higher in the boat than the stock plastic one. This will take some getting used to, although consider that this is the seat that comes with all carbon Guigui Prod Helixirs, which are a similar size and dimension to the plastic boats. Although in the plastic boat it will affect things differently to the way volume is changed with size with the carbon boats. This is because when the carbon boats are adjusted to size, the width stays the same. Whereas the two plastic boat sizes are different in width.
As a side note I noticed that plastic Helixirs are out of stock a lot of the time. This could be the company playing catch up with supplies, or… could it be that a new Helixir is on the way? The current design, is over four years old. Time flies! So it probably is due an update given the current trend for much shorter boats in the form of the Rockstar V and Rebound.
Installing the kit
The first thing you need to do is to remove all the old outfitting. If you’ve owned the boat for a while like I have, this isn’t as simple as it seems. I quickly came up against a roadblock early on as I tried to remove the bow and stern bulkheads. There’s an Allen bolt holding them in place. Simple, you might think, just unscrew them and that’s that. No such luck I’m afraid. On both the front and rear when I undid the bolt the plastic that surrounded the metal screw thread that the bolt screws into broke, leaving the bolt to rotate without being undone.
I tried getting behind it via a small gap in the bulkhead to grip the surround with pliers, but it wasn’t having any of it. I tried to drill the bolt out, but only succeeded in creating so much heat that the plastic surrounding the bolt began to melt. In the end I was left with no choice but to try and get a mini hacksaw in there and cut the bulkheads out as close to the bolt as I could. If you end up in a similar situation this will mean that once the old bulkheads are out there is no turning back. Unlike my Jitsu outfitting that I kept and reinstalled when I sold the boat, by contrast the only place those old bulkheads will be going is the local tip.

Once the bulkheads were removed I tried one more time to see if I could get a grip on the thread surround to try and get the bolts out. It failed, so I was left with no choice but to leave the bolts and the remaining bulkhead plastic in place. Just try to cut away as much as you can.
Once all your old outfitting has been removed, clean up the inside of the hull as much as you can. For the final clean I used a rag with rubbing alcohol and then hoovered out any bits of dirt.
New bulkheads
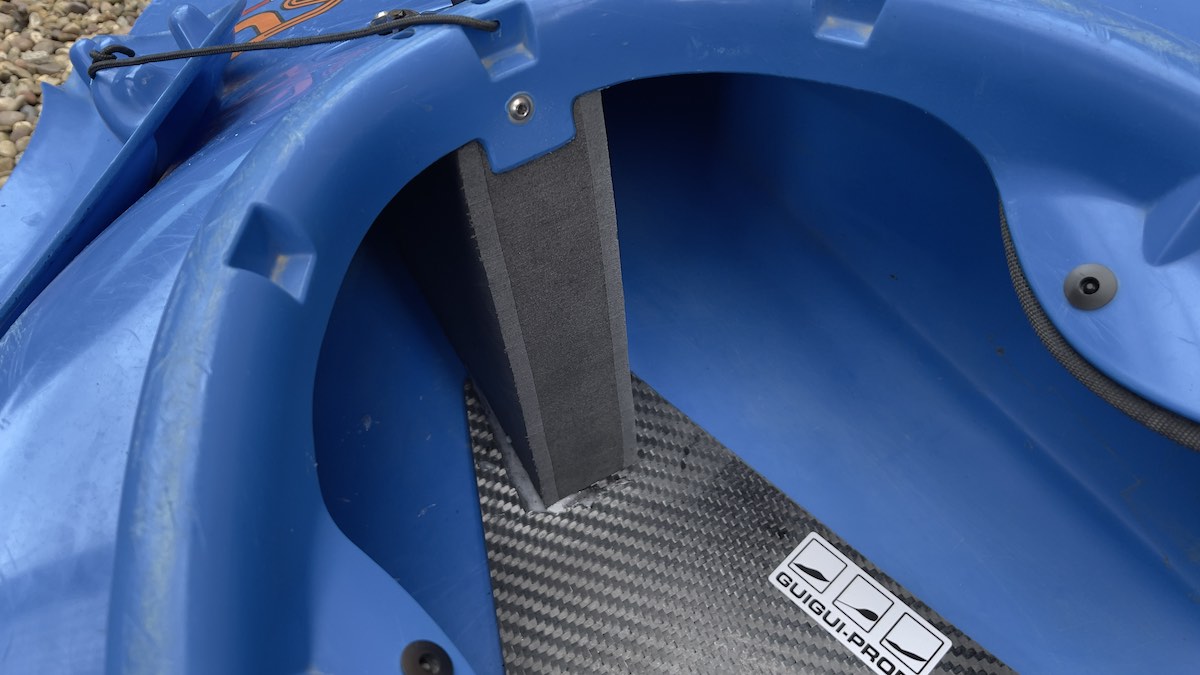
Now it’s time to put the rear bulkhead in. It’s a tight fit and I need to use some gentle persuasion to get it seated behind the offending remaining Allen bolt fixing without damaging the foam, but it was perfectly doable. Make sure you get it as straight and as central as you possibly can.
Then, apply some contact adhesive to the rear of the carbon rail and slot it into the small gap at the bottom of the stern bulkhead. Again, try to make this as straight as you can, using the bow bulkhead Allen bolt as a guide. It will generally go in pretty straight due to the side walls, but there is some flex, so try to be sure.
Next you need to apply some contact adhesive to the front bottom of the bow bulkhead and install it. Again this is a tight fit, so I would recommend performing a practice fit first before you put any glue on it. Next are the finishing touch foam cutouts that glue to the ends of the bow and stern bulkheads, which, once installed will cover up the offending Allen key bolts.
Now you need to fix the carbon side walls to the side of the hull. In his video, Guillaume uses a hand riveter, and at first this seemed like a wonderful idea. You drill two holes into the carbon fibre and boat plastic each side, and then use the hand riveter to easily and simply fix things in place… Well, that’s the theory anyway.
Despite practicing on the now junked original bulkheads, all I managed to do with the rivet was pull it through the plastic leaving me with an unremovable rivet in the carbon fibre! Arrrgggggggh!
Soooo, I had to very carefully, a bit at a time to prevent overheating, drill out the rivet. Thankfully I succeeded, and the only sign I’d cocked up was that the hole was ever so slightly bigger now. If it had gone wrong, it would have been a very expensive mistake!
I decided not to risk using rivets again, and instead went to B&Q to buy some M5 Allen bolts and washers. Unfortunately I couldn’t get ones that were short enough for my liking, but at 16mm long they still worked out well enough. In fact they worked out very well indeed. The bolt nut is easily accessible with a small spanner, and I used Loctite thread locker to help ensure they won’t work loose easily. Ideally I would have used bolts a bit larger than M5, but I couldn’t find any in stock that were short enough.

Next are the side reinforcement blocks. These are extremely important, and they glue in between the carbon sidewall and the boat hull, giving the boat side rigidity.
Right on time at this point the delivery man turned up with my express delivered foam seat. Thanks Jake! All that remained to be done was to install said seat, and put the hip pads back in. You could make your own foam hip pads and glue them to the carbon side wall, and in fact this is something I may well do in the future. However, for now I have installed the pre-existing hip pads. With the Guigui foam seat you will need less padding in your hip pads because the seat lifts you up much more than the plastic version.

Conclusions
I have yet to take the boat on the water at the time of writing this review, but I can say that from my initial outfitting session I am much more nicely fitted into the boat than I was before, with far better all round contact and comfort, particularly since I had previously installed Jackson Bees Knees into the thigh hooks. Because the foam seat fits to the hull using an interlocking material (it isn’t Velcro, but something much more like those no-nails picture hanging attachments) it can be adjusted fore and aft more more finely than the plastic seat to get a perfect placement. It’s also a ton more comfortable, and, as I found when I used one in my Jitsu, it’s also warmer when wet than a plastic seat.

If you are into freestyle and you can’t afford a carbon boat, yet want something lighter, so far I can recommend the Helixir carbon outfitting kit. It isn’t cheap, and it’s not quite as simple to install into a well-used boat as it might look, but the weight saving is very noticeable. I’ll keep this review updated once I’ve had a chance to take it onto the water once this damned ear infection has cleared up!
Update: I’ve now taken the boat out onto the water. I’m much better fitted into the boat now, and it floats higher. Cartwheel ends are snappier and easier to bring around. Very similar to my experiences when I lightened my Jitsu. Thankfully the higher seat hasn’t made the boat feel twitchy, although the higher centre of gravity along with the much better seat design means that the edge to edge performance seems much more responsive. I like it.

Was installing the Bees Knees easy in this boat, and are you happy with the way they work? I was finally able to get an EXO Helixir in the US. I don’t have it yet, but I think I may want to add the Bees Knees.
I really like the Bees Knees. Really makes the boat a lot more comfortable for me and saves me having to add in extra foam to the sidewalls to keep my legs in place.